
I have never been a really big fan of cheesecake. But, the other day I saw a picture on the front of a magazine, and it looked so good that I found myself craving a slice.
I have never made a cheesecake...because it seemed like a monumental task and, like I said, it has never been my favorite. I do make some little cheesecake tarts, which I really like and have actually blogged...I know that doesn't make sense, soooo welcome to my world. What I really like is CHOCOLATE! Because it is Valentine's Day in just a few days, I decided this would be the perfect dessert for our Valentine's Bunco!
I had a group of friends coming over to my house to play Bunco. I've played in this group for close to 2 decades (that makes it sound like a really long time)! We started playing when our children were very young. I can remember all our girls always wanting to play. I think our group has gone from being about the game to being about the food and the chatting. Here are a few of the girls...some are missing so I will have to catch them later.
 |
| Stephanie, Tricia, Julie |
 |
| Terri and Rebecca |
 |
| Babette |
D |
| Jolynn |
 |
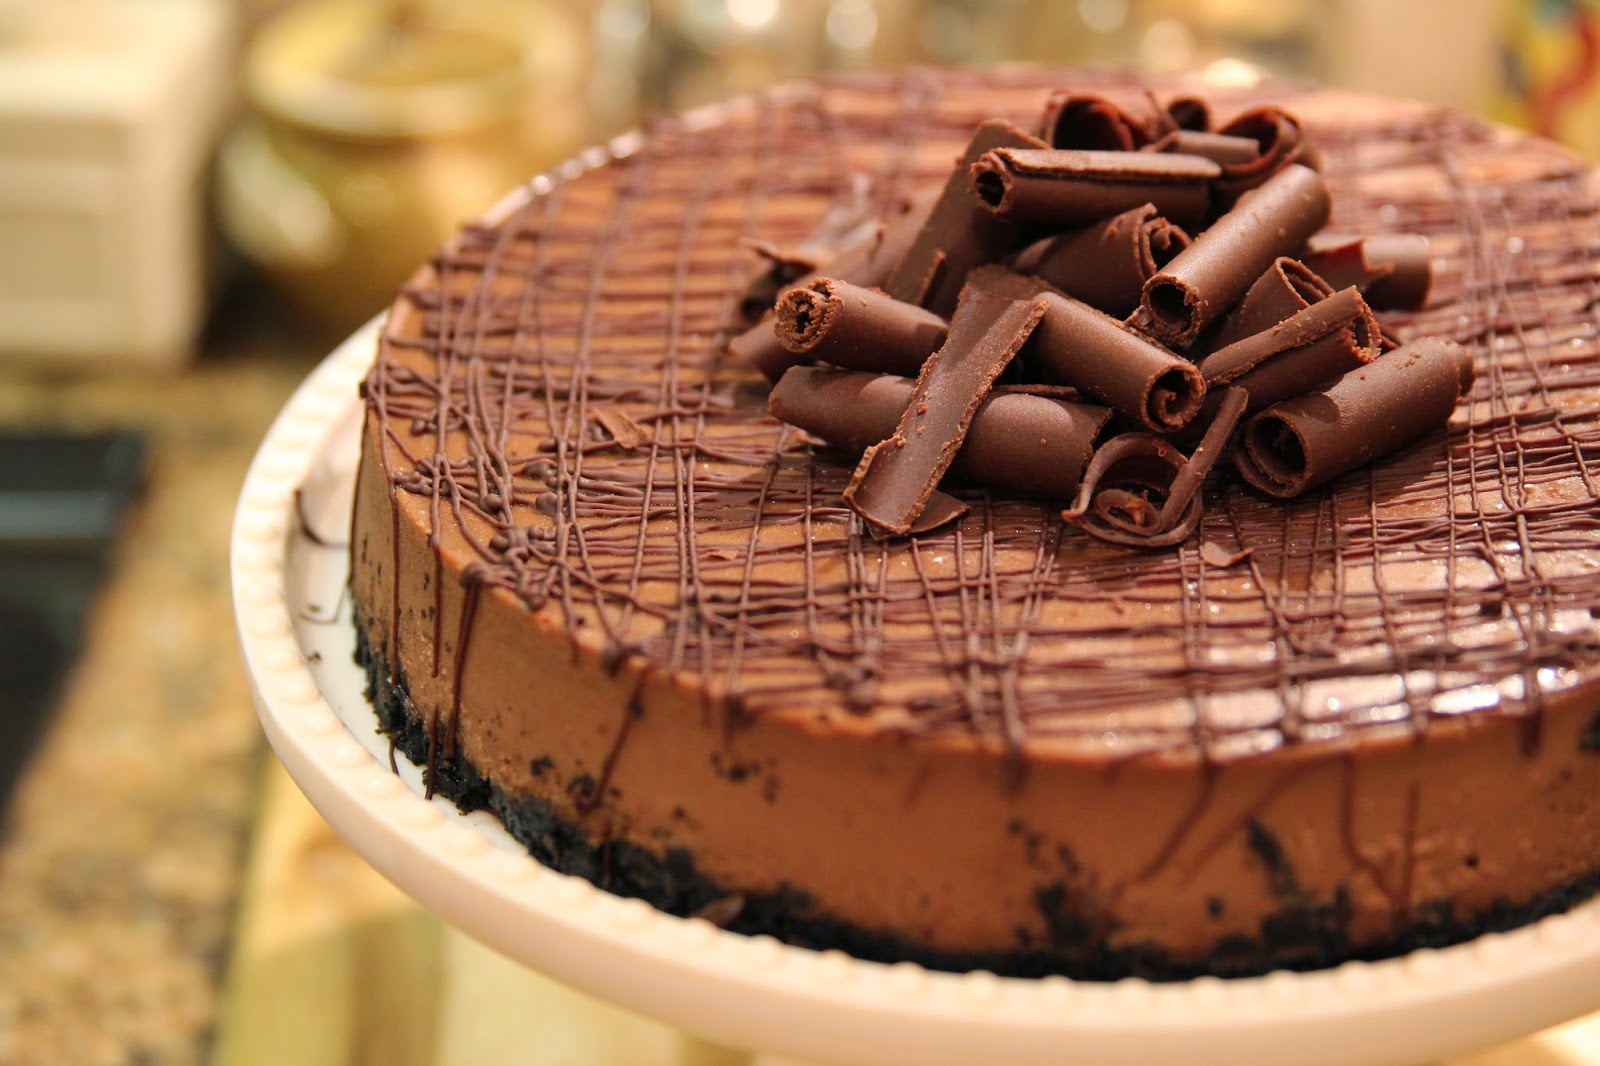
| Debbie and Tricia Two days and three cheesecakes later, I have decided that making a cheesecake is not that difficult but there are some things that you must do or must not do to ensure a cheesecake that is creamy and does not crack on the top. I learned something with each one and the final one turned out perfect. Here are some of the things I learned... 1. Low and Slow is the name of the game when it comes to baking cheesecakes. If you are in a rush, then you just need to wait or make something else. 2. A water bath is a cheesecakes best friend. The first recipe I tried said to just cover the cheesecake for the first hour and that would provide enough moisture but it ended up with a crack the size of the grand canyon. The second one said to just place a pan of water in the oven. But the third time, I placed it in a water bath and voila...creamy and no cracks. 3. Bake and then turn the oven off and leave the cheesecake in the oven for an hour. Going from one extreme temperature to another may cause cracks in the surface. I was so paranoid that after an hour, I just opened my oven door and didn't take it out for another 30 minutes. Probably unnecessary but I was just about tired of baking a cheesecake that look perfect only to have it crack at the end. 4. Do not overbake. When the cheesecake looks dry or firm on the sides but jiggles in the middle, turn off your oven. 5. Make sure you scrape down the sides when beating the cream cheese and also, when incorporating the chocolate mixtures into the cream cheese. Also, check the bottom of the bowl to make sure there is no cream cheese lingering there. You do not want any little cheesecake flecks showing up in your batter. When I poured my cheesecake into my pan, I used a spatula to urge it out of the mixing bowl but I did so very gently. I know this sounds like a lot of steps, but I am just telling you all the things I learned with three tries so that you will only need one try. And it helps me remember the next time I make a cheesecake, since it will probably be a while. I can't stop eating it and that isn't good when you are trying to lose some weight! The best thing about this cheesecake is that you can make this ahead a day or two before you need it. In fact, you should make it, at the very least, a day ahead because it needs 8-24 hours to chill and set. Also, because it is so rich, you can serve 12 people smaller slices, and still have a slice or two left over. I had asked my sister-in-law to play bunco with us that night, but she was packing up to go and visit her grandbabies. She loves Chocolate Cheesecake so I ran her and my brother in law a slice down to their house at around 9:30 p.m and before I left, it was gone, gone, gone! Haha! If you have time, drizzle the chocolate over the cheesecake before serving. Because the cheesecake will be cold, the chocolate drizzle will harden immediately. Make those little chocolate curls on top, ahead of time, store in a bag in the freezer, and add to the cheesecake just before serving. I had so much fun. It was like magic, the way they curled up on their own. The directions follow the recipe below. So there it is, everything I learned about making a cheesecake. I hope you try this recipe for the chocolate lover(s) you know...they will love you for it! HAPPY VALENTINES DAY EVERYONE! |

MILK CHOCOLATE CHEESECAKE
WITH RASPBERRIES AND FRESH WHIPPED CREAM
16 Oreos
2 tablespoons sugar2 tablespoons butter, melted
(2) 3.3 ounce Dove Milk Chocolate Candy Bars
1/3 cup Heavy Cream
4 tablespoons Sweetened Condensed Milk
3/4 cup sugar
1/4 teaspoon salt
2 tablespoons unsweetened cocoa
(3) 8-ounce packages Cream Cheese, room temperature
4 eggs, room temperature
2 teaspoons Vanilla
1. Place oven rack in the middle of oven and preheat to 350 degrees.
2. Spray a 9-inch spring form pan with Baker's Joy and place on a 13 X 9 baking sheet.
3. Break up oreos into smaller pieces and place in a food processor. Add 2 tablespoons sugar. Process for about 30 seconds. Add butter. Pulse 6 times.
4. Pour oreo mixture into pan and tamp down with a measuring cup.
5. Bake in 350 degree oven for 10 minutes.
6. Take out of oven and off of baking sheet and place on cooling rack until cooled.
7. Reduce oven to 300 degrees.
8. Break up the dove chocolate bar into small pieces and place in a medium size, glass, microwave safe bowl. Add the whipping cream and the condensed milk. Place in the microwave at 50 percent power for 60 seconds, stopping to stir every 15 seconds until melted.
9. Set aside to cool.
10. In a small bowl, mix cocoa, salt, and 3/4 cup sugar until well incorporated.
11. Place the cream cheese in a stand mixer fitted with the paddle attachment.
12. In a small bowl, mix cocoa, salt, and 3/4 cup sugar until well incorporated.
13. Add the cocoa mixture to the cream cheese, and beat on medium speed for 2 minutes, stopping to scrape bowl as needed.
14. Add the melted chocolate mixture and mix on medium-low until incorporated. Make sure that all of the cream cheese is completely blended with the chocolate mixture.
15. Add one egg at a time on low until well incorporated. Add the vanilla with the last egg.
16. Cover the bottom and up the sides with aluminum foil making sure to bring the aluminum foil up around the sides. I used a couple of sheets going opposite directions. The first sheet should be come up on all sides at least 1 inch so that the water will not get into the pan.
17. Pour cheese mixture on top of the cooled crust...DO NOT SCRAPE SIDES. Any cream cheese bits could cause the cheesecake to split on the top when baking.
18. Drop the pan lightly on a hard surface a few times to cause the air bubbles to rise to the top and burst.
19. Place spring-form pan in a large baking pan and place in oven.
20. Pour boiling water into the pan to just about 1/2 inch up the sides.
21. Bake for 1 hour and 5 minutes rotating once halfway through the baking time.
22. Turn off oven but do not open the oven door. Leave the cheesecake in the oven for 1 more hour.
23. Take out of oven, but leave in the spring form pan. I actually opened the oven door and let it stay in there for about 30 more minutes. I don't think you have to do this but after making 2 cheesecakes that split right down the middle at the end of the cooking time, I wasn't taking any chances.
24. Run a knife around the inside edge to make sure the cheesecake does not stick.
25. Let cool completely.
26. Remove the outer pan from the bottom. Slide a spatula under the cake and slide onto a cake plate or stand. Cover with wax paper, then plastic wrap and refrigerate for 8-24 hours before serving.
27. Before serving or after cheesecake has been in the refrigerator and is chilled, drizzle with the chocolate and top with chocolate curls. Serve with raspberries and fresh whipped cream.

CHOCOLATE CURLS: I melted 1/2 cup semi-sweet chocolate morsels and 1 tablespoon of shortening in the microwave for about 30 seconds or until melted. Pour out on the back of a baking sheet and smooth with a spatula.

Place in the freezer for about 2 minutes. Take out and touch the top with your finger.

If it leaves a fingerprint, it needs about another minute in the freezer. You want it to be just cold enough to not leave a fingerprint but not too cold or it will not roll properly.

Take a metal spatula and flip it over and scrape the chocolate slowly. It should curl. If it just crumbles, it is too cold. Just give it a minute and try again.


CHOCOLATE DRIZZLE: Melt 1/2 cup semi-sweet chocolate morsels with 1 tablespoon shortening and melt in microwave in a small microwave safe bowl for about 30 seconds or until melted.
Pour into a Ziploc bag. Slice the smallest piece off of one corner.
NOTE: Make sure your cheesecake is cold so the chocolate will harden immediately when it hits the cheesecake. That is important so that there no running together, just straight and perfect lines. Hold it about 8 inches above the cheesecake and working quickly in a back and forth motion. Turn the cheesecake 180 degrees and repeat the motion. You can use as much or as little as you want.
ENJOY!
No comments:
Post a Comment