Saturday, June 30, 2012

A TIME TO CELEBRATE AND BE THANKFUL!

My Mom's 84th Birthday was yesterday!  

Unfortunately, we didn't get to do much celebrating because she was in the hospital.  But today, she was in her own little home and feeling better.  I would've loved to have cooked her favorite meal but after spending 3 days in the hospital with her, I wasn't up to it so we picked up Carrabba's Italian food...yummm!  My sister-in-law made her the A-m-a-z-i-n-g Jiffy Chocolate Cake.  This is the same cake in an earlier post that I declared the ugliest cake I had ever made.  This time around....it was perfect...thanks to Judy!

My Mom and my sister-in-law Judy


My Mom, Dorothy, has the purest, kindest heart of anyone I have ever known.  She loves God, her family, her little dog Rusty, and her sweet friends.  She can still tell jokes (I never could)!  She can speak pig-latin with record speed and has a regular group of girls that she play cards with on Friday nights....when she is up to it.   She loves to bake peach cobbler and share her recipe with everyone (and I mean everyone!!!)  She remembers stories about my children that I cannot even remember and stories about me when I was a child.  But the thing I love most about my Mom would be the way she has always made me feel so very loved.  She has told me all my life, and more times than I can count, that she waited and prayed 15 years for a child (I am an only child) and that she was glad she was not able to have children naturally (I am adopted) because she would have missed out on having me for her daughter.  She told me this just a couple of weeks ago and even though I am 49 years old,  that still makes me feel special every time I hear her say it.  

I love her so much and I am so thankful that God chose her to be my mother.  Doesn't He always know how to give the very best gifts?  


HAPPY 84TH BIRTHDAY MOM!

I LOVE YOU!!!
        

Grilled Fish Tacos with Cilantro-Lime Sauce

I love grilled fish and tilapia is my favorite fish to grill at home when I need something quick and light.  It has a delicate flavor and can be cooked so many different ways.   Today, I'm going to share my favorite way to prepare and serve tilapia. 
This pan makes grilling tilapia a snap!!


I use this grill pan all the time.  It is so easy to heat on a stove burner and it cleans up very easily (that put a smile on my face)!  This one is a 9X11 All-Clad and I have had it probably 5 years, if not longer.  


Brush melted butter on both sides of fish.  You could probably use olive oil, I just never have so I couldn't tell you how it tastes.  If you do, let me know how it goes!


Sprinkle with Old Bay seasoning!  It is awesome on seafood!  Be generous....totally coat the fish.  I only do one side and then put that side on the grill.  I usually spray the grill pan with Pam but I don't think with the butter that it is totally necessary. 


Cook until browned and a little charred on one side, then flip and season and cook until fish is white and flaky inside.  All in all, it takes approximately 15-20 minutes.  I like mine well done. 


Place fish in a tortilla (I prefer flour but you can use corn).  This tortilla was one that only had 2 carbs...woohoo!  Add shredded cabbage....I used a bag of shredded cabbage and carrots that was ready to use.  Then I added my Cilantro-Lime Sauce (the recipe is in my previous blog post and served with a grilled corn-avocado salad....scrumptious!!!!

Enjoy!!


Thursday, June 28, 2012

Cilantro-Lime Sauce


Every once in a while, I go on a quest for the perfect recipe.  Not too long ago, I was obsessed with finding the perfect vanilla cupcake recipe (I'll post that another day)!  Several pounds later, and requests from my family to quit making them my royal tasters, I found it...the go-to, perfect vanilla cupcake!

I said all that to say that I have tried umpteen (southern word for lots and lots) recipes for a good cilantro-lime sauce to serve on fish tacos.  What I found and tweaked is a recipe that I literally could eat by the spoonful!  And it is easy to make too!  Grab your food processor and let's get started!

CILANTRO-LIME SAUCE

1/2 cup green onions, chopped
1/2 cup cilantro, chopped
2-4 large garlic, chopped
6 tablespoons light mayonnaise
6 tablespoons light sour cream
1/2 teaspoon cumin
2 teaspoons fresh lime rind, grated
3 teaspoons fresh lime juice
salt and pepper to taste

Put all of the ingredients into a food processor and blend until it is smooth. 
Refrigerate until ready to use.

This makes approximately 1-1/2 cups


Chop green onions


Add Garlic (you can chop it instead of mincing) to processor

Add green onions and cilantro


Love this kitchen gadget


The little wooden citrus reamer makes this job easy!


This recipe uses light ingredients but doesn't taste like it!
Start with about 1/2 teaspoon and then add more if you like!
I filled my pepper grinder with these little jewels! (sorry for the  close up of my badly-in-need-of-a-manicure hand)


This machine is priceless in the kitchen!

So yummy and the lime and cilantro taste so fresh!!


ENJOY!!!


Tuesday, June 19, 2012

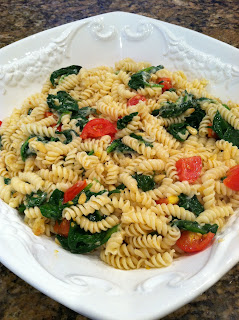
Giada's Fusili Pasta with Spinach and Asiago Cheese

Emily, Janna, Giada, Judy, Holly

Last year for my birthday, my husband surprised me with the best gift ever!  He somehow managed to find out about a cooking show in Atlanta, Georgia featuring some of my favorite chefs, and he arranged for me (bright pink shirt), my daughter Holly (far right), my sister-in-law Judy (in the pink sweater), and her daughter Emily (far left) to spend the weekend meeting Giada and Paula Deen, getting to see and sample some awesome new products, and eat some amazing food (oink-oink)!

I LOVE Giada!  She was very down-to-earth, so nice to talk to and absolutely beautiful!  Before I left for Atlanta, I printed out her recipe for Fusili Pasta.  It is one of my go-to dishes when I am running short on time.  She was so sweet to sign it for me and I framed it with the above picture and it is hanging in my kitchen.  In fact, tonight I didn't want to look up the recipe so I just used the framed recipe on the wall instead!


I had a two-fold reason for cooking this dish tonight.  -First of all, I still have tomatoes that I do not want to waste!  Secondly, I wanted to cook something fast!  


Martha Stewart Collection

This pot is one of my favorites in the kitchen.  It is  heavy, porcelain covered cast-iron.  For the longest I wanted a Le Creuset but they are pretty expensive so I kept putting off getting one.  Then I found this red pot by Martha Stewart at Macys for under $80.  I use it for so many things...chili, beans, soups, pasta, etc.  It cleans up  really easy too!

So here is the recipe.  I have changed it just a little because of wanting to use ingredients I had on hand.


FUSILI PASTA WITH SPINACH AND ASIAGO CHEESE

12 ounces of fusili or rotini pasta

1/4 cup olive oil

4 garlic cloves, minced

9 ounce bag of spinach, rough chopped

12 ounces of chopped cherry tomatoes

1 cup of Asiago Cheese, grated 

1/2 cup Parmesan Cheese, grated

salt and pepper to taste


In a large pot, add water for pasta and alot of kosher salt (2 or 3 tablespoons ~ I just guess).  the pasta will absorb the salt in the water so be careful when adding more to the dish.  Follow the directions on the bag or box for pasta.  Remember to not overcook the pasta.  It is better to undercook because the pasta will cook a little more when you add it to the rest of the ingredients.


Add garlic to oil and saute just to flavor the oil, approximately 2 minutes.

I like to use equal amounts of these two olive oils in this dish


Add the spinach and tomatoes and cook until spinach begins to wilt.


Add the cooked pasta and toss!


Add your cheeses....

You can use this or.....


you can use a mixture like this...grated is better though!


I added some pine nuts because I thought it would go nicely with this dish (and I love a reason to eat pine nuts)!


Transfer pasta to a serving dish


Make some garlic bread ...... 
1 loaf of french bread
1 stick of butter, softened
6-8 cloves of garlic, minced
Combine butter and garlic and spread on both sides of each slice of bread.
Broil under a broiler until golden brown on both sides.
OH MY GOSH....it is the bomb!!


*A salad and/or some lightly breaded, pan fried chicken tenders would go well with this.
We were just wanting something quick to fix and eat so we wouldn't have to pick up take-out!


BON APPETITO Y'ALL!!


Sunday, June 17, 2012

HEAVENLY BLUEBERRY MUFFINS (Best Blueberry Muffins Ever)


One is not enough of these blueberry muffins!  I made these this morning for my husband for Father's Day!  They are really easy to make...a little time consuming but so worth it.  I watched him eat 3 for breakfast then when we got home and before lunch he ate 2 more.  I don't know how many he ate in between but I know he just ate another one!  My daughter saw them on the counter before lunch and she said she was going to eat half before lunch and the other half after lunch.  Yeah....it was gone before lunch!!   And now that I'm thinking about it....I have eaten 3 myself!  

The streusel on top is why I call it heavenly and the muffin is like a little, vanilla cloud!  

These would make the perfect dish to share, make for a brunch, or to give as a gift.  This is one of my favorite recipes and I hope that you will like it so much it becomes a favorite of yours too!


HEAVENLY BLUEBERRY MUFFINS

Preheat oven to 350 degrees. Place paper liners in muffin pans or spray pan with Bakers Joy.  

Streusel Topping
1/2 cup all-purpose flour
1/2 cup sugar
4 tablespoons butter, slightly softened and cut into 1/2 inch pieces
In a medium bowl, stir flour and sugar.  Add butter pieces and combine mixture with a fork until topping resembles coarse crumbs.  Set aside

Muffin Batter
2-1/2 cups all purpose flour
2 teaspoon baking powder
1/2 teaspoon baking soda
1-1/2 sticks butter (room temp.)
1-1/2 cups sugar
3 large eggs, (room temp.) 
1-1/2 teaspoon vanilla extract
8 ounces sour cream
1/4 cup milk
2-1/2 cups fresh blueberries
In a medium bowl, sift flour, baking powder and baking soda.
With an electric mixer fitted with a paddle attachment, cream the butter and sugar until light and fluffy (about 5 minutes).  
At low speed, beat  in one egg at a time, then add vanilla, sour cream, and milk until combined.  
Add 1/3 of dry ingredients at a time and beat until just combined.  
With a spatula, evenly fold blueberries into batter.
Spoon batter into muffin pans and fill each cup to the top. 
Sprinkle streusel topping over batter.
Bake for 30-35 minutes until a toothpick comes out clean.
*I usually start checking these early because I like them lightly brown not dark.
Makes 24 muffins.


Saturday, June 16, 2012

How To Comment On My Blog and Others!

There have been several people who said they have not been able to comment on this blog so.......

Yesterday, I made it my mission to figure out how to comment on blogs (although I temporarily disabled my blog...ugh!)

You will need a Google account if you don't have one. The good news..... it's FREE!

I started from "How to Set Up a Google Account" all the way to the end.  

If you already have a Google account, just go to Step 3.

I hope this helps because I really want to hear your comments and get your feedback.  That's what it is all about!  
P.S. I deleted the nanajanna463 account, so you won't be able to find me under that username....it was just for demonstration!  I'm still under littlemagnoliakitchen  : )

HERE WE GO.....


Step 1
     Go to "Create a New Google Account".  Follow the instructions (for some reason where it says last name
      my AOL account came up but you just need to put your last name.


Step 2
     When you see welcome, you can just exit out and.....


Step 3
    Sign in using your new user name and password (to make sure everything is working good)


Step 4
     Open a new tab and (look where the little arrow is in the picture)


Step 5
    Type in "littlemagnoliakitchen.blogspot.com" or whatever blog you are wanting to comment on


Step 6
     When my blog (or any other blog you are wanting to comment on) comes up, scroll down until you get to           the end of the day you are wanting to make a comment on


Step 7
     Click where it says "comments" (in the picture the little finger is pointed to where you need to click)


Step 8
     Write your comment in the little box


Step 9
     Type in the word, choose your identity (this is what will appear when you post a comment on a blog).
     Click "Publish Your Comment" and you are done!!

Thursday, June 14, 2012

ONE OF THOSE DAYS.....

We all have "one of those days" in the kitchen when you wish you could start over.  Well today was one of those days for me!!

Jessica  is turning 23 tomorrow!  Woo-Hoo!!  I just love this girl.  She is one of the sweetest and prettiest girls I know and I wanted to make her a dessert for her birthday.  When I asked her yesterday what kind of dessert she wanted, she said chocolate!!  Perfect!  I just happen to have a recipe for a chocolate cake that I have been making for years and years and everyone who loves chocolate loves this cake.  It is so easy to make and it is probably the best chocolate cake I have ever eaten....I can say that because it is not my recipe so if you follow the instructions, you can't go wrong....or that is what I used to think before today!!!!

I should have known something was gonna go wrong because I was running ahead of schedule and I am always running behind!

I had enough time to actually take pictures to share on here while I was cooking.  

I added all the ingredients and poured it in a pan.  


Let me say right here that I know that disposable aluminum pans are ugly!  My thinking was that if I put it in one she wouldn't have to worry about washing the dish and returning it to me!  But I really hate the way it looks....especially for a birthday cake so that was my first mistake!   Anyway, I popped it in the oven and while it was cooking, I started the icing (my favorite part because I love to lick the spoon)!!


Just a little FYI...not too long ago I was trying to find a really great tasting vanilla for baking.  I bought this Tahitian Vanilla at Williams-Sonoma and I really love it.  Definitely makes the difference in flavor when baking!

I know this doesn't sound like a big deal, but I remembered that my sifter had broken and I didn't have one to sift the powdered sugar and you know how lumpy icing made with powdered sugar can be!  


I just had high hopes that I could beat it enough to get the lumps out....ummm nope!!  


When I poured it on the cake it looked like it had chickenpox....ugh!!


What to do?....what to do?........    I know....I will make some chocolate covered strawberries and put them on the cake to cover the "lumps" !  "Oh that is gonna look sooo good" is what I am thinking!  I decided I would make them this morning!

F.Y.I..... I found this Baker's Chocolate in it's own container.  So all I had to do was pop it in the microwave. When I was done, I just threw the entire container away...no mess!!  AMAZING!!


At this point, I have made them and they look really pretty so why? why? why...didn't I just leave well enough alone?  

I decide....well it is her birthday...I think I will cover them with sprinkles!  I can just hear you all saying NOOOOOO!!!!!  But YESSSSS I did!

I had sprinkles all over my kitchen when I was done and then I looked at my cake and thought "wow...this is just embarassing"!  I don't care how I arranged them....it was obvious nothing was gonna help! 


Sweet Jessica.....Bless her heart.....she got the ugliest cake I have ever made!!

Happy 23rd Birthday Jessica!!!


I hope you don't let this stop you from making this cake....it really is the BEST chocolate cake I have ever eaten!!  

Happy Birthday Jessica!  I'll make this up to you!!


JIFFY CHOCOLATE CAKE

CAKE:
1-1/2 sticks butter
1 cup water
4 tablespoons cocoa
2 cups sugar
2 cups flour
2 eggs
1/2 cup buttermilk
1 teaspoon baking soda
2 teaspoons vanilla

ICING:
1 stick of butter
1/2 cup milk
3-1/2 tablespoons cocoa
1 box powdered sugar, sifted
1 teaspoon vanilla

In a medium saucepan, over medium heat, bring butter, water and cocoa to a boil.  Set aside.  In a large mixing bowl, combine sugar and flour.  Add chocolate mixture and mix well with a mixer.  Add eggs, buttermilk, baking soda and 2 teaspoons vanilla and beat until well blended.  Pour into a greased, floured 13 X 9 pan and bake for 40 minutes in a 350 degree oven.

While cake is cooking, add butter, milk, 3-1/2 tablespoons cocoa in a medium saucepan over medium heat until boiling.  Take off fire and add powdered sugar a little at a time until well blended.  Add 1 teaspoon vanilla and pour over warm cake!  Enjoy!